Showing posts with label Bread. Show all posts

Saturday, December 28, 2013

Prepping for Bread

If any of you are like me, I like things to be quick and easy most days when it comes to the kitchen!  This is a post to help out those who like to make their own bread!  This is something that can be done in less than 10 mins and will keep you stocked for ease. :)

Prepping dry ingredients for Bread:

1. Choose your favorite recipe for bread.  These pictures are of my Onion Bread recipe.
2. Pull out all the dry ingredients minus the yeast.
3. You can pour ingredients directly into the bags if you'd like or do it like me.  I put them all in bowls and mix with a whisk before I put it in bags.


4. Label each bag with the name of the bread, how big of a loaf it makes and then the order in which things go into your bread machine (or in a bowl if you're doing it old school!).  *note: to make it more clear, you might want to put an extra line where you dump in the bag ingredients before the yeast*


5. Store on your shelf for a rainy day or whenever you'd like a quick loaf of bread! :)


Tuesday, July 9, 2013

Muffin Base

Everyone has enjoyed a muffin or two.  Some love banana nut, some are all over the chocolate muffins, and some like poppy seeds.  Well, for those of you in adventurous cooking moods I have the perfect muffin base for any type of muffin you could ever want!  Mix it up and make several different kinds or just make a big batch of your favorites!

Muffin Base

(Dark Cherries and Pineapple, Cinnamon Raisin, Chocolate Chip)

*makes 12 regular sized muffins

1 3/4 C. Flour
1/2 C. Sugar
1/2 C. Brown Sugar
3/4 tsp. Salt
2 1/2 tsp. Baking Soda
1 C. Milk
1/3 C. Oil
1 Egg (well beaten)
1/4 C. Apple Sauce (only use this if you DON'T use some type of fruit in the muffins.  this adds a little extra moisture to the batter.)

1. Add all dry ingredients in a bowl and sift well.
2. Beat the egg in another bowl and then add the rest of the wet ingredients to that bowl.
3. Slowly add the wet ingredients to the dry and mix 10-15 times.  DO NOT OVER MIX.
4. This is where you can add your mix-ins.  (blueberries, cinnamon and raisin, cherry and pineapple, chocolate chips, poppy seeds, banana and nuts, etc)
5. Fill the cupcake cups 2/3 full and cook at 400 degrees for 18-22 mins.  Keep a close eye on them due to altitude and different ovens.
6. Check them with a toothpick.  When it comes out clean, pull them out and let them sit for about 5 mins before moving to a cooling rack.

These nutrition facts DO NOT include any add-ins

Wednesday, March 20, 2013

Banana Muffin Surprise

My boyfriend isn't fond of bananas and I usually only eat them after a workout.  My mom used to make banana bread aaaaaaaaaaaaaall the time growing up and I haven't had it in years.  I've also never made it before!  So I did a bunch of research and looked at dozens of recipes and I came up with an amazing healthy Banana Muffin that comes with a surprise of only 86 calories per muffin!  These would make an awesome breakfast that's quick and easy to reheat and go!

Banana Muffin Surprise!

 (I don't suggest using muffin liners....
Like I said, it was my first time baking banana bread and they stick horribly!)

*Makes 12 regular sized muffins

1 Large Egg
1/2 tsp. Vanilla Extract
1/3 C. Applesauce (unsweetened)
1/2 C. White Flour
1/4 C. Whole Wheat Flour
1/4 C. Splenda (or other sweetener, you can use honey but it will raise the calories)
1/4 tsp. Salt
1/2 tsp. Baking Powder
1/4 tsp. Baking Soda
1/4 tsp. Cinnamon
2 Large Overripe Bananas, Mashed
4 Tbsp. Dark Chocolate Chips
1/8 C. Sliced Almonds (or any other nut)

1. Set the oven to 350 degrees.
2. In one bowl, mix egg, applesauce, and vanilla extract.
3. In another bowl, mix the flour, baking soda, baking powder, splenda, salt, and cinnamon.
4. Add dry ingredients to the egg mixture and stir.  Then add the mashed bananas and mix well.
5. Here you can stir in the chocolate and nuts or you can put them on top after you pour them into the tin.
6. Spray muffin tin with non stick spray and pour in batter.
7. Cook 30-40 mins. depending on your oven.  Check periodically with a toothpick.  **I had to put mine closer to the bottom of the oven to ensure cooking thoroughly**
8. Remove when done and cool on baking rack.


Monday, December 31, 2012

Soft, Chewy Pizza Crust

Now, I have a recipe on here already for pizza crust, and it's one that you can use on the fly without having to let it rise.  This recipe however is by far the better choice if you have the time!  It comes out nice and crispy on the bottom and super soft on the inside!  And what's even better is you can play with it and add extras depending on what kind of pizza you're making!  Give it a shot!

Pizza Crust
(Spicy BBQ Chicken Pizza!)

*makes one 12 inch crust

1/2 C. and 2 Tbsp. Warm Water (very important that it's warm)
1 1/8 tsp. Yeast
1/2 tsp. Honey
1/2 tsp. Salt
1 Tbsp. Olive Oil
1 1/2 C. Flour

1. If you are like me and have a bread maker, this is the easiest thing in the world to make.  Start with your liquids in the pan.  Water, oil, and the honey.  Then add the flour, salt, and any fun seasonings you'd like to add. (i.e. chili powder and garlic powder for a mexican style pizza, oregano and parmesan for a chicken alfredo pizza, parsley for a tomato basil pizza, etc)  I generally do a full tsp of any/each.
2. Turn the machine on and use the dough setting and in 90 minutes it's dough!
3. Preheat the oven to 475 degrees.
4. Then you can take out the dough, use a little flour (I like to use cornmeal with pizza dough) and stretch it to the size of your pan.  I recommend lining the pan with parchment paper for an easy clean up!
*A great tip I came across as well: If you don't have a pizza stone, turn a cookie sheet upside down and use parchment paper.  Turns out crispy and awesome*
5. Sauce it, top it, and throw it in the oven for 12-15 mins depending on the oven.
6. Enjoy!

When you're not using a bread maker:
1. Stir honey, yeast and warm water together in a large bowl.  Let this sit for 5-10 mins to activate the yeast.
2. When it starts to bubble, stir in the salt, oil, and half the flour and mix well.
3. Slowly add the other half of the flour mixing it well.  The dough should be tacky, but not sticky to your hands.
4. Kneed the dough for about 10 mins (or use the dough hook on a stand mixer for 6 mins)
5. Pull the dough out and put it in another bowl that is lightly greased. Move it around a bit to cover it so it doesn't dry out.  Cover with plastic wrap and let it rise in a warm place for an hour or two.
6. Move on back up to step 4 in the original directions!

Sunday, December 2, 2012

Fresh off the Pan Tortillas

Considering how much Spanish/Mexican food I make, I've probably spent a fortune on tortillas in the last few years.  I've had some of the best homemade tortillas during some family gatherings and I decided to make some for myself.  These can be made to suit all kinds of different meals and I encourage you to play with it!

Homemade Flour Tortillas


*Makes 8 six inch (really thin) tortillas

2 C. Flour
3/4 tsp. Salt (this is close to taste. Any less will not be enough, but you might want more than this so keep that in mind if you expect the salt to stand out.)
1 tsp. Baking Powder
1 Tbsp. Oil, lard or Shortening (either work I just find it easier to mix with oil)
3/4 C. HOOOOOOOT Water

1. Sift all dry ingredients together.
2. Add the water and oil. (if you use shortening or lard, add that first and mix well with a fork to distribute it)
3. Mix until it starts to form into dough.  Kneed the dough for 5-10 mins adding flour or a sprinkle of water if needs be.
4. Separate into little balls.  If you want fajita size, you'll get about 8, if you want burrito size, this makes about 4.
5. Cover the bowl with a towel and let it sit for 10 mins.
6. Put a pan (cast iron, skillet, griddle, or whatever you have that's large enough for the size you're making) on the stove and heat it to medium high.  Spray the pan with non-stick spray for each tortilla!
7. Flour your counter and the rolling pin and roll them out one at a time. You can make them as thick or thin as you'd like.  I go for the store bought thickness so roll it out about as thick as a dime.
8. Cook in the pan for about 30-45 seconds (or until it starts to brown nicely) on one side.  Flip to the other side and cook for another 15-25 seconds.  Put on a plate covered with a towel or if you're fortunate enough to have a tortilla warmer, you can use that!
9. Repeat until they're all made and enjoy!

**To make things interesting, you can use all kinds of seasonings in the dough depending on what you plan to make with them!  You can make sandwich wraps with herbs, or a thicker tortilla similar to naan.  Garlic powder and chili powder are always favorites as well!  Get a little crazy!**

Thursday, October 11, 2012

Bread Crumbs for Any Dish

I have come across a handful of recipes that require bread crumbs and they don't normally sell them at an inexpensive price in stores.  This is an easy fix with a loaf of bread or ends of loaves for your household!  Bread crumbs freeze really well and last for about 6 months.

Bread Crumbs

1. Preheat oven to 275.
2. Take any pieces of bread, ends, whole loaf, rolls, etc and lay directly on the oven rack.
3. Turn them over after 15 mins.  Bake for another 10-15 mins.
4. Put the pieces in a food processor 2 or 3 at a time and blend to make your crumbs!

*You can get super creative and add all kinds of fun seasonings for different occasions!

Friday, August 31, 2012

Bisquick Replacement

As my mother pointed out to me the other day, I would drop dead before I'd make something like this 5 years ago.  Now, I'm too lazy to go to the store so I made my own Bisquick mix to use in recipes!  This recipe is good up to 4 months frozen and I think 2 months in the fridge...

Bisquick
*Makes just over a cup but you can make in bulk

1 C. Flour
1 1/2 tsp. Baking Powder
1/2 tsp. Salt
1 Tbsp. Crisco

1. Add all dry ingredients and sift or whisk.
2. Cut in the shortening or Crisco.  Use a pastry blender or a fork to mix well so there are no lumps.
3. Use as directed in any recipe that calls for Bisquick.

Wednesday, July 25, 2012

Bread. The Lost Art.

*Insert Raiders of the Lost Ark song*

Anywho!  I was given an amazing bread machine for a graduation present almost 2 years ago.  And I have to say I was a little rusty.  I used to watch my mom make rolls and even help her form them, but I knew nothing about actually MAKING the bread.  So I started dabbling after I got my own.  After many MANY tries, and not so much fails as they were just not great attempts, I finally made a near perfect loaf.  As I've mentioned, I keep forgetting to take pictures during the preparation processes.  But it's usually because I'm up to my ears in food!  I need a nice waterproof camera, that'll do the trick!  So I got a few pictures of the loaf, but none of the helpful steps are illustrated.

Onion Bread
*I'll give amounts for 1 lb and 2 lb loaves.

1 lb
8 oz. Water
1 Tbsp. Butter
1/4 C. Dried Onions
2 C. Flour
1 Tbsp. Sugar
1 Tbsp. Dry Milk
1 tsp. Salt
1 1/4 tsp. Yeast

2 lbs
12 oz. Water
2 Tbsp. Butter
1/3 C. Dried Onions
4 C. Flour
2 Tbsp. Sugar
2 Tbsp. Dry Milk
1 3/4 tsp. Salt
2 1/2 tsp. Yeast

1. (keep in mind, I use my bread machine to make my dough and this is also instructions for a 1 lb loaf, a 2 lb comes with much more dough and would make at least 2 loaves)  Add water, butter, and onions (and for the onions, you can be more liberal.  I usually just grab a big handful.)
2. Add all dry ingredients on top of the wet ones.  Then make a well in the center to add the yeast.
3. Add yeast and set machine on dough.  (Takes 90 mins for mine to process.)
4. Close to the time being up, grease a cookie sheet with Crisco and heat the oven to 200°.
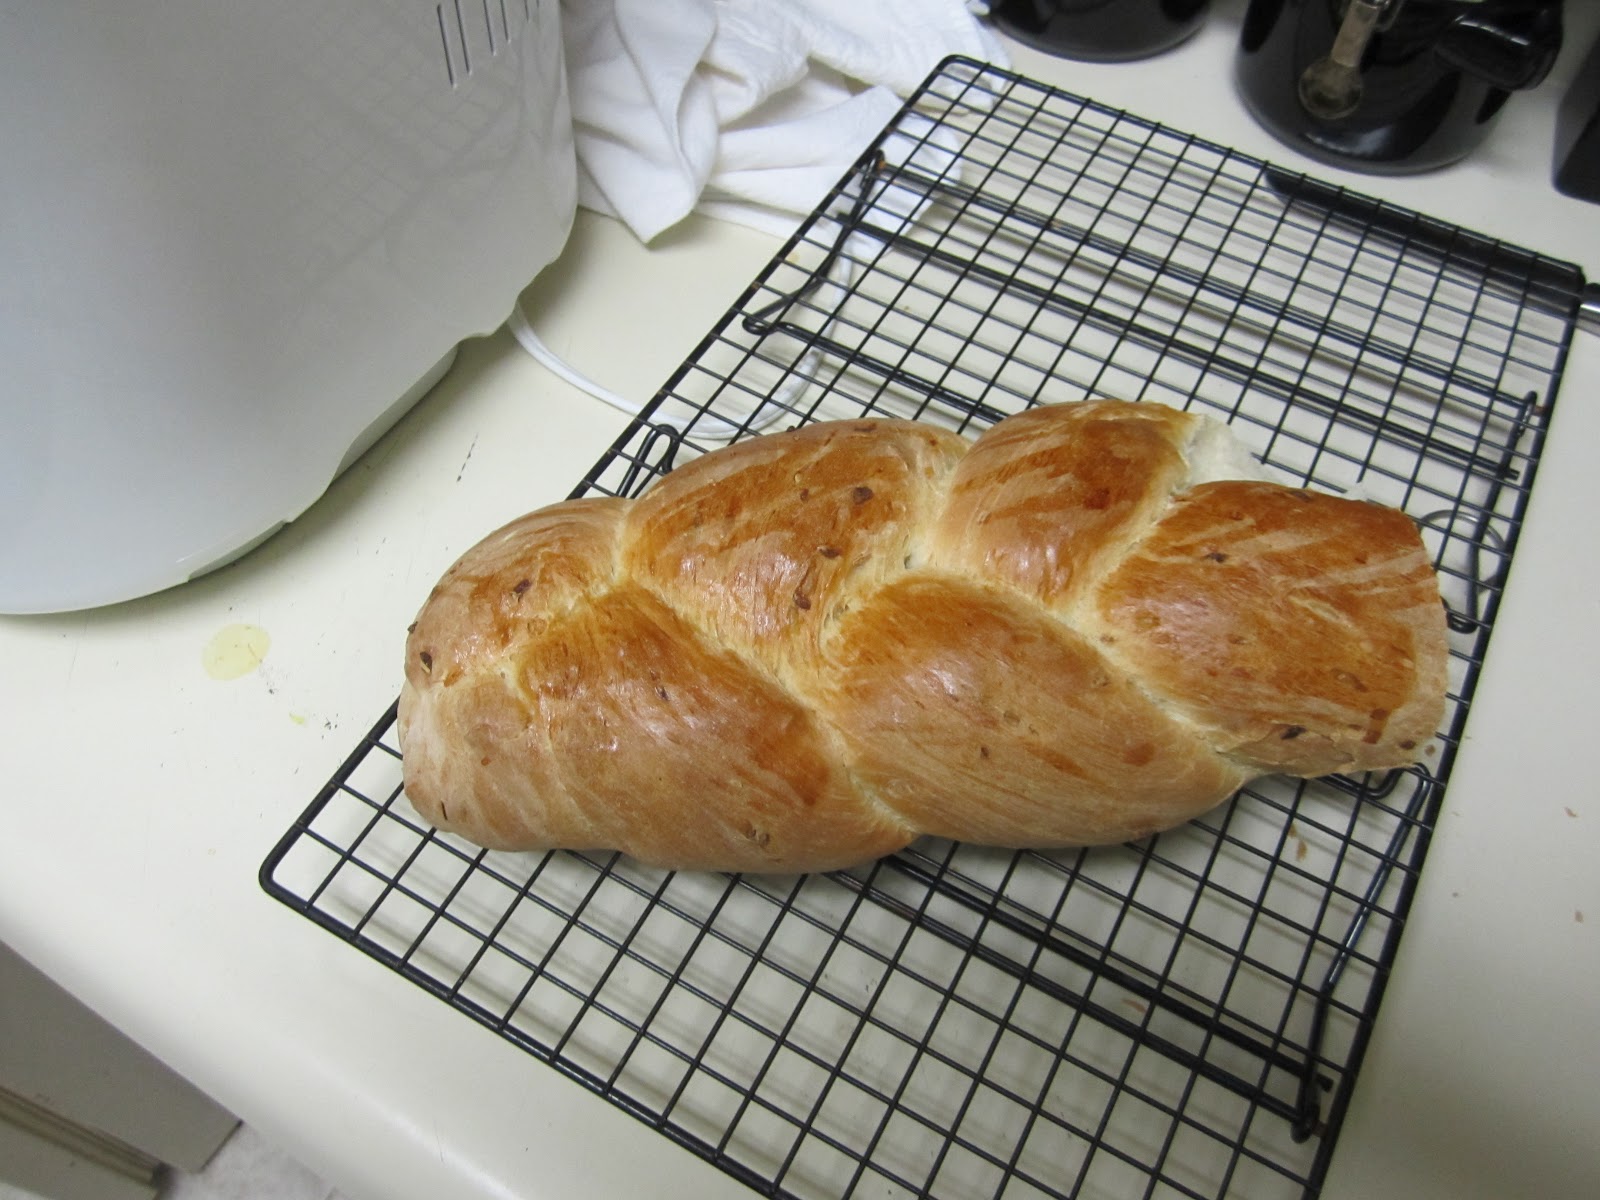
5. Pull out the dough when it's done.  (I use Crisco on my hands instead of flour on the counter because I don't want it to dry out)  Kneed it for about 2-3 mins and then form your loaf of dough.  There are many many different shapes and sizes out there.  The loaf in my picture is a braided loaf.  You cut the dough into three parts and start each strand in the middle working your way out careful not to push too hard.  You want some bubbles left in there!
6. Once all three are as long as you want them (around 12-14 inches) stick the three together at the top.  Start braiding and mash the end together or tuck it under.
7. Lay the loaf on your greased cookie sheet and cover with a flour cloth.  Set at the back of the stove top and let it rise for 45 mins.
8. Separate an egg from it's whites and use a pastry brush or a bbq brush to lightly coat the top with the egg whites.  If you find it difficult, add a tsp of water to the egg whites and beat it together.
9. Raise the oven temp to 350° and wait for it to fully warm up.  Put the bread in and bake for 30 mins.
10. Take the bread off the pan and onto a cooling rack.  Enjoy fresh bread once it's cool!

 This is while the bread machine works on the dough.  About 15 mins into the 90 mins.
 Like I said, no helpful instruction pictures, but here's the finished loaf! (after I ate the end of course!)
And the pretty sammich I made with the loaf.

Tuesday, July 17, 2012

Night on the Town with New Mexico

We recently came back from a trip in New Mexico where I spent a lot of time in the kitchen with the grandparents.  I decided to try and recreate the meal as best as I could.  Here's what came outta the pot.

Green Chile Stew
*serves 8ish


1 Small Onion (chopped)
1 Cup Fresh Roasted Green Chiles (or more for spice)
1.5-2 lbs Beef for stew (cut into smaller chunks)
1 Tbsp. Oil
2 Beef Bullion Cubes
6-8 Cups of Water
2 Potatoes (diced)
Salt, Pepper, Garlic to taste
(Flour if you want it to be thicker)

 
1. Add oil, onion and meat to a pot.  Brown the meat and continue cooking until onions are transparent.  (add seasonings here while cooking)   
2. Add the green chiles, water, and bullion cubes.  Bring to a boil then simmer for an hour.   
3. Add potatoes and simmer for another 30 mins.  Taste and add more salt due to the potatoes (most likely).  Thicken at this point as well if you so choose.

Pinto Beans
*serves 8-10ish

2 C. Pinto Beans
1 small Onion (chopped)
2-3 Garlic Cloved (minced)
2 Beef Bullion Cubes
9 C. Water
Salt for taste

1. Sift through beans for rocks and rinse.
2. Saute onions and garlic with a touch of oil.
3. Add all ingredients minus the salt into a pressure cooker.
4. Set on high until the "pressure gauge" starts going nuts.  Let it cook for 4-5 more mins.  Then turn the heat down to medium or 5/6 depending on your stove.  Cook for an hour.
5. Take off the heat, let sit for 20 mins and if it still won't open, run under cool water.
6. Add salt to taste and boil for approx. 5 mins.

 Sopapillas
*makes 8-10 depending on size

2 C. Flour
1 tsp. Salt
2 tsp. Baking Soda
2 Tbsp. Crisco or Shortening
1 C. HOT Water
Veggie Oil to fry

1. Sift dry ingredients and Crisco really well.
2. Add water and kneed with hands for around 10 mins.  Dough should be barely tacky, not dry, not really wet.  (add a TOUCH of flour or water depending then kneed again)
3. Let it sit, covered, for approx. 30 mins.
4. Form small balls of dough, smaller than an egg.  Roll out one at a time, should be around 1/8 of an inch; very thin.  Use your finger to make 3 small holes in the dough to help it aerate.
5. Your oil should be warming and I keep mine at Med-High or 7/8 through-out.
6. Fry one at a time.  Use a fork to pop particularly large bubbles.  They don't take much time at all to cook on either side.  Maybe 30-45 seconds a ball.  Pull out and put in a bowl with paper towels and repeat with the next ball of dough.


The Whole NM Sheebang
*serves 2-8 depending on leftovers!

Smother the sopapillas with the Green Chile and the Beans and then top with your choice of cheeses, salsas, fresh chopped onions, or anything else you might like.

*NOTE: This is a Spanish meal but for ease of searching it's under Mexican*

 This is a picture with my shredded beef, not the green chile stew, but it's essentially the same thing!